Dulce de leche

IMG_20150910_111910.wm

Dulce de leche is a milk caramel traditionally made by simmering milk and sugar for a very long time until it caramelizes to give a dark, creamy, thick textured sauce… It can be used in desserts and cakes as dipping sauce, toppings and fillings etc. After coming across the name several times and reading about it how irresistible it is as such, I wanted to try this for a long time. Finally when I came across a Dulce de leche brownie recipe I couldn’t wait anymore. I tried it out and both the Dulce de leche and the brownies turned out good. There are many methods to do this and I tried it using the pressure cooker method with a can of condensed milk. The method is quite simple but there are some important points to be followed as there is a danger of the can exploding if done carelessly. Having said that as of now I have tried it twice and it was successful both the times; so this method works for me.

Ingredients

A can of sweetened condensed milk

Method

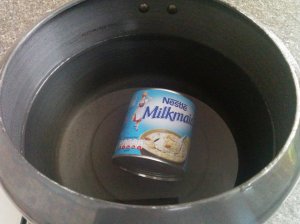
  1. Place the sealed condensed milk can on the bottom of the cooker on its side and fill it with water till the water level is atleast one inch above the surface of the can. Also let the water level does not exceed the maximum level of the pressure cooker. Now close the cooker and switch on the heat.IMG_20150903_101718
  2. After the first whistle, reduce the heat to low and continue to cook for 20 to 30 mins (cooking time depends on how thick we want the DDL to be; I got a thick texture after 30 mins). Switch off the flame and once the pressure releases on its own, open it and carefully remove the can from the cooker.
  3. Leave the can to cool down completely for about 4 to 5 hours. Once it cools down its ready to be opened and used.

Notes

  1. Use a sealed can and place it on its side to avoid it bouncing inside the cooker while cooking.
  2. Water level should be an inch above the surface of the can.
  3. Don’t attempt to open the can until its completely cool down.
  4. Consistency of the DDL will depend upon the cooking time and the efficiency of the cooker.

Eggless Chocolate Chip Cookies

IMG_20150617_135222-01

This is my first post so wanted it to be on something both my hubby and son likes. But my son is very choosy in his taste. He likes mostly sweet dishes and not much savory items. So i decided to do these chocolate chip cookies. My son and me like it crispier and my hubby prefers a chewier one. This recipe is thin and crispier version. I have tried this one quite a few times and always it just gets over on the same day…such a big hit in my house. I always chop some dark chocolate bar for my cookies instead of adding choco chips… like this one better.


Adapted from
 Gayathri’s cookspot
Makes 16 cookies

Ingredients
Butter- 75 gms (room temperature)
Powdered sugar- 6 tablespoon
Milk- 1 tablespoon
Vanilla extract- 1/2 teaspoon
Maida- 1 cup
Baking powder- 1/2 teaspoon
Baking soda- 1/2 teaspoon
Chocolate chips- 6 tablespoon (I chopped a dark chocolate bar)

Method

  1. Preheat the oven to 175C. Sift the flour, baking powder and baking soda once and keep aside.
  2. Cream the butter and sugar with a whisk for 3 to 4 mins. Mix in the vanilla extract and milk.
  3. Add the chopped chocolate and the flour mixture and form a soft dough. (If the dough is very sticky you can add a tablespoon of flour or if its dry a teaspoon of milk; this depends upon the flour we use).
  4. Divide the mixture into 16 balls (I used a tablespoon to measure and divided it roughly). Line a baking tray with parchment paper.
  5. Flatten the balls on the tray with atleast an inch space between them.
  6. Bake it for 15-18 mins untill it gets golden brown colour.
  7. Remove it from the oven and after 3-4 mins transfer to a wire rack to cool down completely. Store in an air tight container.

IMG_20150617_125553-01
Sift the flour, baking powder and baking soda

IMG_20150617_130348-01

Cream the butter and sugar

IMG_20150617_130731-01

Mix in the vanilla extract and milk

IMG_20150617_131059-01

Add the choco chips and flour

IMG_20150617_131350-01

Form a soft dough

IMG_20150617_131837-01

Arrange the cookie dough on the tray

IMG_20150617_132404-01

Flatten it

IMG_20150617_132832-03

Bake for 15-18 mins at 175C

IMG_20150617_134055-01

Cool on a wire rack

IMG_20150617_135349-01Thin and crisp…they were absolutely yumm…

Notes

  1. Baking time varies from oven to oven, so keep an eye towards the end of the baking time.
  2. If using black baking tray, you might have to reduce your baking time by 10 degrees to avoid burning.
  3. I kept few cookies closer in the tray so they almost touched each other towards the end so 1 inch spacing preferred.