Thatta Payiru Kuzhambu/ Cowpeas Gravy

IMG_20150919_120837wm

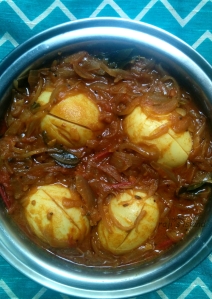
This thatta payiru kuzhambu recipe is a tamarind-based gravy made with cooked thatta payiru/Cowpeas which goes well with rice. During my childhood days, I was never fond of puli kuzhambu. I will just have curd rice if mom makes it. So after marriage totally avoided cooking this type of gravies. But over time my taste has got changed and nowadays I have really started to enjoy these types of traditional gravies. This was the first time I tried it with thatta payiru and it turned out good. A simple poriyal and papad will be a good accompaniment for this dish.

Ingredients

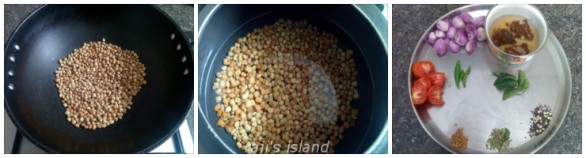
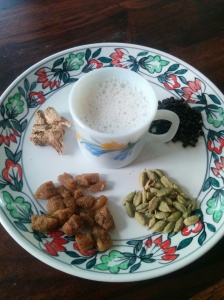
Thatta payiru/Cowpeas – 1/2 cup
Gingeley oil – 2 tblsp
Mustard seeds – ¼ tsp
Sauf  – ¼ tsp
Fenugreek seeds – 1/8 tsp
Asafoetida – a pinch
Small onion – 15, chopped, or Big onion – 1
Tomato – 1, medium sized, chopped
Green chillies – 2, slited
Kuzhambu milagai thool – 2.5 tblsp
Tamarind – lemon sized (soaked in water)
Curry leaves – few
Salt – to taste

Method

  1. Dry roast the cowpeas for a few mins to get nice aroma and pressure cook for 3 whistles till it’s cooked softly.step_1
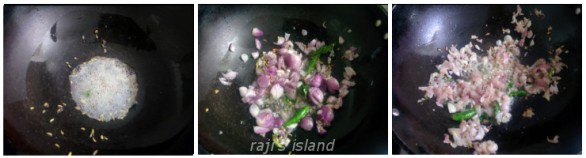
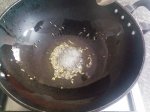
  2. Heat the oil in a pan and add the mustard seeds, sauf, feengreek seeds and asafoetida. Once the mustard seeds crack, add onions, green chillies and curry leaves and sauté till the onions are transparent.step_2
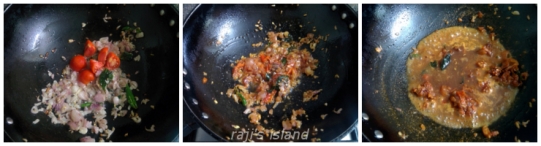
  3. Now add the cut tomatoes and cook for a few mins. Add the kuzhambu milagai thool and mix well.step_3
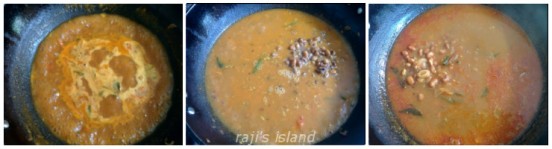
  4. Finally add the tamarind extract made, the cooked beans, required water and salt and bring it to boil. When the gravy starts to boil lower the heat and let it cook covered for 15–20 mins till the oil separates out. Serve hot with steamed rice.    step_4

Notes

  1. Two tsps of chilli powder, 3 tsps of coriander podwer and 1 tsp of cumin powder can be replaced instead of the kuzhambu milagai thool.
  2. Two tblspns of grated coconut can be grinded and added at the last stage.

Submitting this recipe to  My Legume Love Affair hosted by Herbs, Spices and Traditions, The Well Seasoned Cook and Lisa’s Kitchen.

Dulce de leche

IMG_20150910_111910.wm

Dulce de leche is a milk caramel traditionally made by simmering milk and sugar for a very long time until it caramelizes to give a dark, creamy, thick textured sauce… It can be used in desserts and cakes as dipping sauce, toppings and fillings etc. After coming across the name several times and reading about it how irresistible it is as such, I wanted to try this for a long time. Finally when I came across a Dulce de leche brownie recipe I couldn’t wait anymore. I tried it out and both the Dulce de leche and the brownies turned out good. There are many methods to do this and I tried it using the pressure cooker method with a can of condensed milk. The method is quite simple but there are some important points to be followed as there is a danger of the can exploding if done carelessly. Having said that as of now I have tried it twice and it was successful both the times; so this method works for me.

Ingredients

A can of sweetened condensed milk

Method

  1. Place the sealed condensed milk can on the bottom of the cooker on its side and fill it with water till the water level is atleast one inch above the surface of the can. Also let the water level does not exceed the maximum level of the pressure cooker. Now close the cooker and switch on the heat.IMG_20150903_101718
  2. After the first whistle, reduce the heat to low and continue to cook for 20 to 30 mins (cooking time depends on how thick we want the DDL to be; I got a thick texture after 30 mins). Switch off the flame and once the pressure releases on its own, open it and carefully remove the can from the cooker.
  3. Leave the can to cool down completely for about 4 to 5 hours. Once it cools down its ready to be opened and used.

Notes

  1. Use a sealed can and place it on its side to avoid it bouncing inside the cooker while cooking.
  2. Water level should be an inch above the surface of the can.
  3. Don’t attempt to open the can until its completely cool down.
  4. Consistency of the DDL will depend upon the cooking time and the efficiency of the cooker.

Chicken Cafrael

IMG_20150702_130901.wmChicken cafrael is one great dish from the goan cuisine. On our recent visit to goa I had this dish and totally fell in love with it. On the last day of our travel when we asked our driver to take us to a good place for lunch, he took us to an old restaurant called Florentine. He also asked us to try their chicken cafrael since its a very popular recipe there. As he told it really stood out of all the other dishes we tried there. We were glad that we visited that place; its definitely a place to be not missed if you are travelling to Goa. Another thing I liked about goan cuisine is the names of the dishes, vindaloo, xacuti, bebinca (a yummy goan dessert), sounded new to me from the usual menu. Infact even after returning to Bangalore I was asking my hubby to take me to some goan restaurant to have this cafrael and bebinca again. So sometime back when I thought of trying this one I came across this recipe which I felt was something similar to what we had tasted. I did some minor changes to the recipe to suit our taste. It turned out good and my son asked me to make it one more time for him, so time to save the recipe.

Adapted from Goanfoodrecipes

Ingredients

Chicken – ½ kg (cleaned and cut into 4 or 5 big pieces)
Oil – 1.5 tablespoon
Butter – 1 teaspoon
Salt – to taste

To grind

Coriander(cilantro) leaves – ½ a bunch (4 or 5 stocks)
Green chilies – 3-4
Ginger – 1.5 inch piece
Garlic cloves – 6-7
Poppy seeds – 1/2 tablespoon (soak in water for some time)
Peppercorns – 7
Cinnamon – 1 small piece
Cumin seeds – 1 teaspoon
Turmeric powder – 1/4 teaspoon
Tamarind – 1 teaspoon
Cloves – 2-3

Method

  1. Grind the ingredients in the list to a fine paste, adding little water. Add it to the cleaned chicken and marinate for 2 hours in the refrigerator.
  2. Heat the oil in a pan. Add the marinated chicken pieces (reserve the marinade) and saute until brown colouring occurs on the sides of the chicken pieces.
  3. Now add the remaining marinate and butter, mix well. When it comes to a boil, cook covered in low flame for 30 to 40 mins till its done and the oil separates out (Check for water in between; if it looks very dry, little water can be added else not needed). Serve with rotis. Traditionally its served with a goan bread called poee.

Notes

  1. Reduce the oil and increase the butter for more taste.
  2. More the marination time, better the flavour; original recipe asks for overnight marination.

Egg Masala

IMG_20150701_135055_wm

This Egg masala is one of my family favourite. My mom used to make this quite often for me and my sister. We both like it a lot. It’s a simple yet satisfying meal. It just needs some simple ingredients from the kitchen, very less preparation time required. Sometimes when I don’t have time to plan or feel lazy to do some cooking this recipe comes as a saviour. No grinding, no ginger garlic paste or no garam masala still it tastes great. Sounds simple, doesn’t it?

Ingredients
Hard boiled eggs – 4
Big onions – 3
Tomato, medium size – 1
Curry leaves – few
Mustard – ¼ teaspoon
Split urad dhall (split black lentil) – ¼ teaspoon
Sauf (fennel seeds) – 3/4 teaspoon
Kulambu milagai thool (sambhar powder) – 1.5 tablespoon
Chilli powder – 1 teaspoon
Turmeric powder – ¼ teaspoon
Oil – 3 tablespoons
Salt – to taste

Method

  1. Heat the oil in a pan; add the mustard seeds, urad dhall and sauf. Once the mustard starts to pop, add the curry leaves and the onions and sauté well till it’s translucent. Add the tomatoes and cook for 2-3 mins.
  2. Now add the turmeric powder, kulambu milagai thool, chilli powder and combine. After 2 mins add a cup of water and increase the heat. When the gravy starts to boil, cover it with a lid and let it simmer for 15-20 mins till the oil separates and the gravy reaches a thick consistency.
  3. Now slit the eggs, add it to the gravy and cook for another 10 mins in low heat. Serve hot with steamed rice or rotis.

Palm Sugar Candy Milk Mix (Panakarkandu Paal)

IMG_20150624_151226.wm Panakarkandu paal (Palm sugar candy milk) is used as a home remedy for cold and cough. Usually it’s boiled with turmeric powder and pepper. A year back a friend of mine introduced me to a ready-made mix of palm sugar candy milk. My son who doesn’t drink milk started to like its taste. Whenever I try something new he asks for its name, ingredients and after his initial inquiry is over he decides whether to taste it. So when he asked about this milk I told him its vanilla milkshake, if only I had told its panakarkandu paal he would have ran a mile… lol. Seeing the pack’s ingredients it was very easy to give a try; so when I got hold of a good batch of panakarkandu, I tried it out for myself and it was very good. This recipe has a mild pepper flavor… just right for my five-year old. If it’s going to be for adults you can add some extra pepper and dry ginger. This mix is very handy; just mix it with some hot milk whenever needed.

Ingredients

Panakarkandu (Palm sugar candy) – 1 cup
Pepper – 1 tablespoon
Dry ginger (sukku) – 1 inch piece
Cardamom – 6

Method

  1. Crush the panakarkandu and dry ginger to small pieces before adding it to the mixer.
  2. Add the pepper, cardamom and the crushed dry ginger to a mixer and pulse it once. Now add the crushed panakarkandu to it and grind it to make a powder. Store in an airtight container.
  3. To make the panakarkandu milk, just add 2 teaspoons of the mix to 150 ml of hot milk, mix well, strain it and serve.

Notes

    1. This powder can also be boiled with milk and a ¼ teaspoon of turmeric powder for 3 to 4 mins.
    2. Add extra pepper for a strong flavour.

Eggless Chocolate Chip Cookies

IMG_20150617_135222-01

This is my first post so wanted it to be on something both my hubby and son likes. But my son is very choosy in his taste. He likes mostly sweet dishes and not much savory items. So i decided to do these chocolate chip cookies. My son and me like it crispier and my hubby prefers a chewier one. This recipe is thin and crispier version. I have tried this one quite a few times and always it just gets over on the same day…such a big hit in my house. I always chop some dark chocolate bar for my cookies instead of adding choco chips… like this one better.


Adapted from
 Gayathri’s cookspot
Makes 16 cookies

Ingredients
Butter- 75 gms (room temperature)
Powdered sugar- 6 tablespoon
Milk- 1 tablespoon
Vanilla extract- 1/2 teaspoon
Maida- 1 cup
Baking powder- 1/2 teaspoon
Baking soda- 1/2 teaspoon
Chocolate chips- 6 tablespoon (I chopped a dark chocolate bar)

Method

  1. Preheat the oven to 175C. Sift the flour, baking powder and baking soda once and keep aside.
  2. Cream the butter and sugar with a whisk for 3 to 4 mins. Mix in the vanilla extract and milk.
  3. Add the chopped chocolate and the flour mixture and form a soft dough. (If the dough is very sticky you can add a tablespoon of flour or if its dry a teaspoon of milk; this depends upon the flour we use).
  4. Divide the mixture into 16 balls (I used a tablespoon to measure and divided it roughly). Line a baking tray with parchment paper.
  5. Flatten the balls on the tray with atleast an inch space between them.
  6. Bake it for 15-18 mins untill it gets golden brown colour.
  7. Remove it from the oven and after 3-4 mins transfer to a wire rack to cool down completely. Store in an air tight container.

IMG_20150617_125553-01
Sift the flour, baking powder and baking soda

IMG_20150617_130348-01

Cream the butter and sugar

IMG_20150617_130731-01

Mix in the vanilla extract and milk

IMG_20150617_131059-01

Add the choco chips and flour

IMG_20150617_131350-01

Form a soft dough

IMG_20150617_131837-01

Arrange the cookie dough on the tray

IMG_20150617_132404-01

Flatten it

IMG_20150617_132832-03

Bake for 15-18 mins at 175C

IMG_20150617_134055-01

Cool on a wire rack

IMG_20150617_135349-01Thin and crisp…they were absolutely yumm…

Notes

  1. Baking time varies from oven to oven, so keep an eye towards the end of the baking time.
  2. If using black baking tray, you might have to reduce your baking time by 10 degrees to avoid burning.
  3. I kept few cookies closer in the tray so they almost touched each other towards the end so 1 inch spacing preferred.